Engineer to Order Procedure
1. Overview
Engineer to Order (ETO) is the workflow for custom engagements where the customer brings you a requirement and your team designs the solution from scratch before anything is built. Nothing gets manufactured until the design is finalised and signed off.
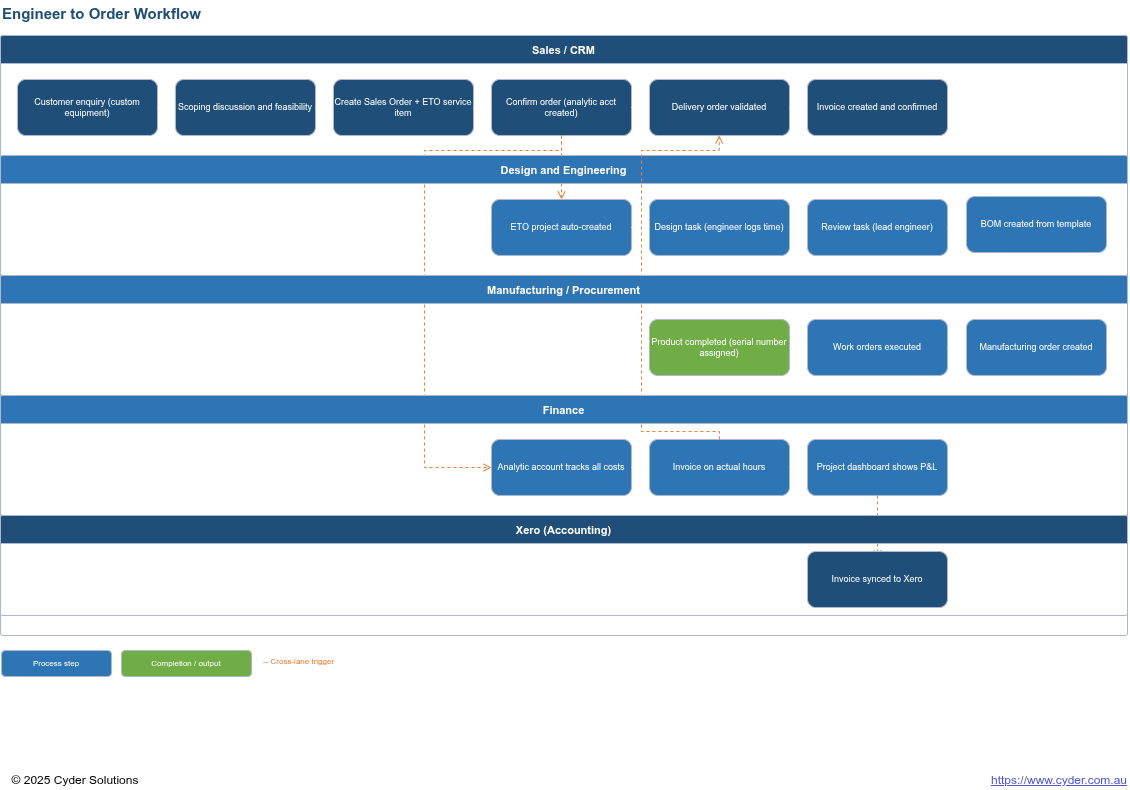
Odoo handles ETO by connecting Sales, Projects, Manufacturing, and Accounting into a single tracked workflow. A confirmed sales order automatically kicks off a design project, time logged by your engineers and designers flows through to the invoice, and every cost rolls up against a single analytic account so you have a clear picture of where each job stands at any point.
2. Understanding Engineer to Order
How it differs from a standard sale
In a standard product sale you know what you are selling before the order is placed. The product exists, the price is set, and the process is straightforward: order, pick, dispatch, invoice. In an ETO engagement the product does not exist yet. The specification has to be developed first, and that design work is itself a billable professional service.
This has practical implications for how the work is sequenced and how you charge for it. Design happens before manufacturing, so you need a way to bill for that time separately and track those costs alongside the eventual manufacturing costs. The analytic accounting feature in Odoo handles this by acting as a cost container for the entire job, regardless of whether a cost originates in Projects, Manufacturing, or Purchasing.
ETO versus Make to Order
Make to Order (MTO) is often confused with ETO because both involve building something for a specific customer. With MTO the design is already locked in. You have a defined product with an existing bill of materials, and the order triggers production of that known thing. With ETO there is no existing design. The first phase of the job is creating one, and that phase is billed as a service in its own right.
The five stages of an ETO job
Every ETO engagement moves through five stages, even if the pace and complexity varies by project:
- Design and engineering - Your team works with the customer to develop the specification. Time is logged and billed as a professional service.
- Bill of materials creation - Once the design is signed off, the lead engineer builds the specific BOM for this job: the exact components, quantities, and manufacturing operations required.
- Manufacturing - The product is built to specification, with all component costs and work centre time captured against the job.
- Installation and commissioning - The equipment is delivered to the customer site, installed, and commissioned by your field team. The customer signs off once the system is confirmed as operating correctly.
- Invoicing - The customer is invoiced for the full engagement, using actual hours worked rather than the original estimate where the two differ.
3. One-Time Configuration
These steps are performed once during system setup. They are included here so you understand what has been configured and why, because several of these settings directly affect how ETO jobs behave when you work through them day to day.
Analytic accounting
Analytic accounting is the foundation of ETO cost tracking. When enabled, Odoo creates a dedicated analytic account for each confirmed ETO sales order. This account collects every cost associated with that job: design hours, purchased components, work centre time. Without it, you can still process orders and manufacturing jobs but there will be no consolidated view of what a specific job actually cost you. The setting is in Accounting > Configuration > Settings > Analytics.
Employee timesheet costs
Each team member who logs time against ETO projects must have an hourly cost rate on their employee profile. This is your internal cost for that person's time, not the rate charged to the customer, and it is used to calculate project margin. Without these rates set, the cost side of the project dashboard will be incomplete. Cost rates are set on each employee record under the Settings tab.
ETO service product and project template
The ETO service product is what you add to the sales order to engage the design phase. When ordered, it automatically creates an analytic account for the job and generates a project from a predefined template containing the standard Design and Review tasks. The moment a customer confirms the engagement, your project structure is ready and your team can begin logging time immediately.
Work centre costs
Work centres represent your physical production capabilities such as a fabrication bay or an assembly area. Each carries an hourly cost reflecting the overhead of operating that part of the business. When a manufacturing order is completed, time spent at each work centre is captured and added to the job's total cost. This is configured in Manufacturing > Configuration > Work Centres.
BOM template
A template bill of materials gives each ETO job a consistent starting structure with your standard manufacturing operations and default durations. For each new job the template is duplicated and customised to match the specific customer requirement.
4. Creating the Sales Order
The ETO workflow begins in Sales. The sales order is the anchor document for the entire engagement, and the project, the analytic account, and the eventual invoice all trace back to it.
Scenario: A client has approached you with a requirement for a custom system. The application is non-standard and requires engineering design before any specification can be confirmed. You need to capture the engagement and get the design phase underway.
Go to Sales > Orders > Quotations and create a new quotation. Select the customer and confirm their contact details are correct. Odoo names the analytic account after this customer and the sales order number, and that name is how you identify the job's costs throughout the project.
The sales order for an ETO engagement typically contains two lines from the outset:
- The ETO Design Service product, with your estimated design hours as the quantity. This is the professional service line that triggers the project and covers the design and engineering phase.
- The physical ETO product that will be manufactured and delivered, priced at the agreed amount.
Having both lines on the order from the start means the full value of the engagement is captured before work begins and the eventual invoice reflects the complete scope without requiring additions later.
Enter the estimated hours on the design service line. This estimate is your best assessment of the design effort based on your scoping conversation. Odoo will adjust to actual hours logged at invoice time, so an honest estimate serves you better than a conservative one.
Confirm the order. Odoo automatically creates the analytic account and generates the ETO project from the template specified on the design service product. Smart buttons for the project and its tasks appear at the top of the sales order, confirming everything has been set up correctly.
Before diving into the work, open the project and review the tasks that have been created from the template. The template provides a standard starting structure, but every job is different. Add, remove, or adjust tasks to reflect what this specific engagement actually requires before assigning team members and getting underway.
Note: If no project smart button appears after confirming, the ETO service product is likely not configured to create a project on order. Check the product settings before proceeding.
5. Managing the Design and Review Tasks
Once the sales order is confirmed the work moves into Projects. The Design and Review tasks were created automatically from your template and the relevant team members can be assigned straight away.
The Design task
The Design task is where your engineer develops the specification in collaboration with the customer. Move it through your standard stages as work progresses and log time in the Timesheets tab of the task, with a brief description of the work done on each entry.
Log time as you go rather than at the close of the task. Descriptions become vague when entered in bulk and you lose the day-by-day record that justifies the hours if a customer queries the invoice later.
Each timesheet entry captures the employee, a description, and the number of hours. The employee's hourly cost rate is applied automatically to calculate the cost contribution of that entry to the project's analytic account.
The Review task
Once the design is complete, the lead engineer picks up the Review task. The same timesheet logging applies. The review phase may involve going back to the customer with questions before the specification is finalised, and all of that time belongs on the Review task. When the review is complete and the design is signed off, move the task to Done.
A useful checkpoint before moving on
The project dashboard already reflects the cost of the design phase before manufacturing begins. Navigate to the ETO project, open the three-dot menu, and select Dashboard under Reporting. You will see hours logged, the cost of those hours, and the revenue from the sales order. If the design phase has consumed significantly more time than estimated, this is the right moment to have that conversation with the customer.
6. Setting Up the Bill of Materials
The bill of materials translates the signed-off design into Odoo's manufacturing language: the exact components, quantities, and operations the manufacturing team will carry out. For each ETO job you duplicate the template BOM and customise it for the specific order.
Scenario: The design phase is complete and the lead engineer has confirmed the specification. You need to build the manufacturing-ready BOM linked to this customer's job.
Go to Manufacturing > Products > Bills of Materials, open the ETO template BOM, and duplicate it. Rename the duplicate to reference the sales order number, for example "SO49 Custom System". This naming is what allows you to reliably select the correct BOM when creating the manufacturing order and keeps it traceable back to the customer engagement.
In the Miscellaneous tab, assign the analytic account for this job in the Project field. This is the account created when the sales order was confirmed. Without this link, component and work centre costs will not appear in the project dashboard.
In the Components tab, add the specific materials with their correct quantities. Check that each component has a current cost set on its product record. These costs feed directly into the project cost analysis and an out-of-date component cost will produce a misleading margin calculation.
In the Operations tab, adjust durations for each manufacturing operation to reflect what this specific job requires. Where you have assembly instructions or worksheets for the manufacturing team, attach them here as PDFs against the relevant operation.
7. Manufacturing the Product
With the BOM complete and linked to the job, the manufacturing team has everything they need.
Go to Manufacturing > Operations > Manufacturing Orders, create a new order, select the ETO product, then select the BOM that references this sales order. Confirm you have selected the job-specific BOM rather than the template. They have similar names and selecting the wrong one produces an order with missing or incorrect components.
Review the Components and Operations tabs before confirming. This takes a couple of minutes and is worth doing even when you are confident the BOM is correct. Confirm the order and the manufacturing team can work through their operations, marking each one complete as they go.
When all operations are complete, click Produce All from the Work Orders tab. Odoo assigns a unique serial number to the finished product. Note this number as you will need it to confirm the correct unit is attached to the delivery order.
8. Delivering the Product
With manufacturing complete, return to the sales order. Because the physical product was included on the order from the outset, Odoo will have already created a delivery order for it. Open the Delivery smart button and confirm the product line shows the correct serial number for the unit that was just manufactured. This is worth checking carefully when multiple ETO jobs are running simultaneously. Validate the delivery.
9. Installation and Commissioning
Delivering the product to the customer site is not the end of the job. For custom engineered equipment, installation and commissioning at the customer site is typically where the engagement is completed and the customer's confidence in the system is established. This step should be planned in advance and treated as a formal part of the project, not an afterthought.
Scenario: The equipment has been delivered to the customer site. Your field technician needs to carry out the physical installation, connect the system, run commissioning checks, and confirm with the customer that everything is operating as specified before sign-off.
In Odoo, the installation visit is handled as a field service job linked to the customer and the equipment record. Raise a field service job from the Field Service application, assign it to the relevant technician, and link it to the customer site. The job should reference the sales order or the equipment serial number so the visit is traceable back to the ETO engagement.
During the visit the technician works through the commissioning checklist for this type of system, records any adjustments made on site, and logs the time spent. Parts consumed during installation are recorded against the job so they flow through to stock and cost tracking.
Once commissioning is complete and the customer has confirmed the system is operating correctly, the job is marked as done and the customer signs off. This sign-off is the practical handover point: from this moment the equipment is the customer's operational asset, and any future visits fall under your standard service and maintenance workflows rather than the ETO project.
A few things worth confirming before closing the installation job:
- The equipment serial number is recorded against the customer site in Odoo so it is findable for future service visits
- Any warranty period applicable to the installation starts from the commissioning date, not the delivery date
- The commissioning checklist and any site-specific notes are attached to the equipment record for the field team's reference on future visits
10. Invoicing
Back on the sales order, click Create Invoice, select Regular Invoice, and create the draft. Before confirming, review the hours recorded against the design service line and confirm that installation labour has been captured correctly if it is being billed as part of this engagement.
Odoo invoices actual hours logged against the job rather than the original estimate. If your team logged 14 hours against a job quoted at 10, the invoice will reflect 14 hours. This is the correct and intended behaviour. If the difference is material, let the customer know before the invoice goes out.
Confirm the invoice when you are satisfied it is correct.
11. Reviewing Project Costs
The project dashboard gives you the full financial picture of a completed ETO job. Navigate to the project in the Project application, open the three-dot menu on the project card, and select Dashboard.
The dashboard shows revenue, costs, and margin for the job with costs broken down by source: employee time from timesheets, component materials from the manufacturing order, and work centre overhead from the operations. All of these are tied to the same analytic account and consolidate here automatically.
Reviewing this dashboard before confirming the invoice gives you the opportunity to verify the margin is in line with expectations. Doing this consistently across multiple ETO jobs also builds better data for estimating future engagements.
12. Troubleshooting
| Symptom | Likely cause | What to do |
|---|---|---|
| No project created when sales order confirmed | ETO service product not configured to create a project on order | Check the product's Create on Order and Project Template fields. Contact your system administrator if the fields are missing. |
| Timesheet costs not showing in the project dashboard | Employee hourly cost rate not set, or timesheets linked to the wrong project | Verify the employee's timesheet cost on their profile Settings tab. Confirm timesheet entries are on the correct project and task. |
| Manufacturing costs not showing in the project dashboard | Analytic account not assigned to the BOM | Open the job BOM, check the Miscellaneous tab, and confirm the analytic account is set in the Project field. |
| Invoice shows estimated hours rather than actual hours | Invoicing policy on the ETO service product set to Ordered Quantities rather than Delivered (Timesheets) | Contact your system administrator. Do not manually override the quantity on the invoice. |
| Wrong BOM selected for the manufacturing order | Template and job-specific BOM have similar names | Cancel the manufacturing order and create a new one with the correct BOM. The job-specific BOM references the sales order number in its name. |
©2026 Cyder Solutions | cyder.com.au