Client Equipment Workshop Repairs - User Guide
Table of Contents
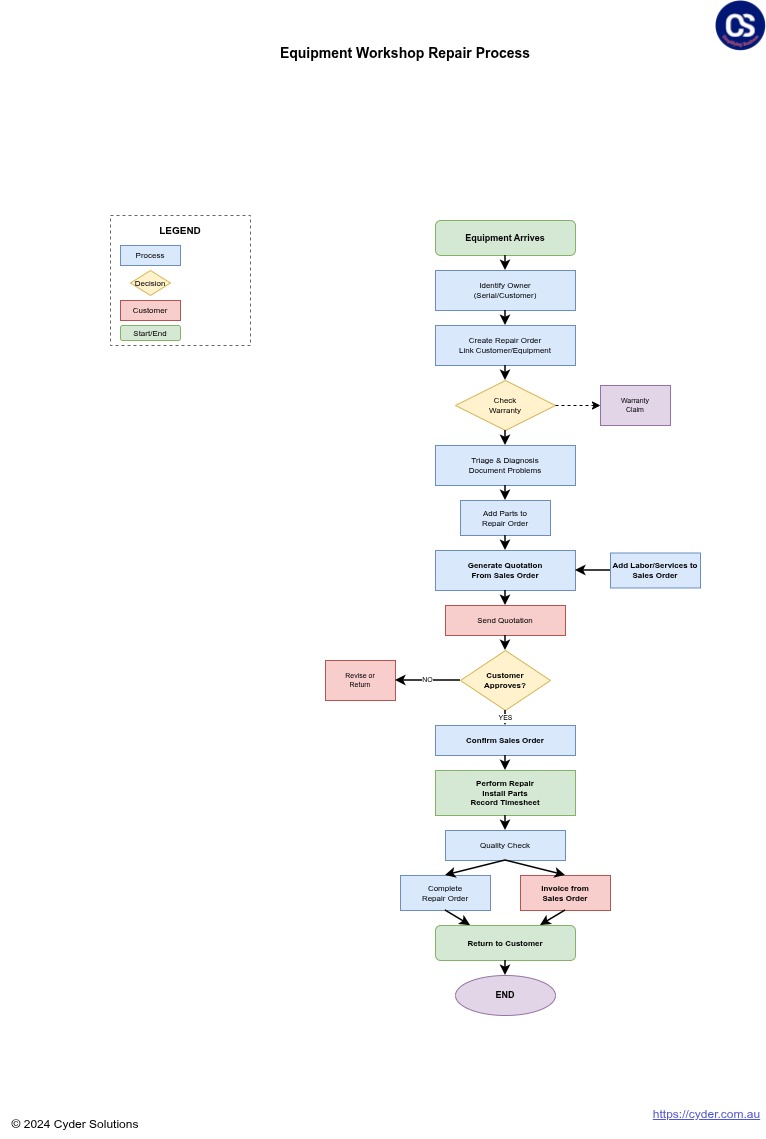
Typical Equipment Repairs Workflow
1. Overview
The Client Equipment Workshop Repairs module provides comprehensive management of equipment repairs performed in workshop or depot environments. This system integrates Odoo's standard repair functionality with client equipment tracking and warranty management, enabling complete workshop repair operations with equipment history, warranty status visibility, and timesheet tracking.
Primary Business Value:
When client equipment requires workshop repairs rather than field service, you need structured repair order management that maintains equipment history, tracks warranty coverage, and manages repair workflow from intake through completion. This system provides complete repair lifecycle management with automatic equipment information population, warranty status visibility, and integration with timesheet tracking for labor cost management.
Key capabilities include:
- Creating repair orders directly from equipment records
- Automatic population of equipment details (serial, model, owner)
- Real-time warranty status visibility on repair orders
- Parts and operations management through standard Odoo repair workflow
- Timesheet integration for labor hour tracking
- Complete repair history per equipment unit
- Owner/customer information integration
- Repair order status tracking (Draft, Confirmed, Under Repair, Ready, Repaired, Cancelled)
2. Understanding Workshop Repairs
Core Concepts
Workshop Repairs vs Field Service: The system distinguishes between workshop repairs (equipment brought to your facility) and field service (technicians travel to equipment location). Workshop repairs use Odoo's standard repair order functionality enhanced with client equipment and warranty integration, while field service uses a separate field service module.
Example:
Customer brings fire extinguisher to your workshop for annual service and recharge. You create a workshop repair order from the equipment record, which automatically populates equipment serial number, model, and owner details. The system displays active warranty status, helping you determine if the service is covered under warranty. After completing the repair, parts and labor costs are recorded, and the repair history is maintained on the equipment record.
Integration with Odoo Repair Module
This module extends Odoo's standard repair functionality with:
- Equipment Linking: Repair orders link directly to client equipment records
- Warranty Integration: Active warranty status displays on repair orders
- Equipment Details: Serial number, model, and owner auto-populate from equipment
- Repair History: All repairs automatically tracked on equipment records
- Timesheet Tracking: Labor hours tracked through timesheet entries
Repair Order States
Repair orders progress through defined workflow states:
- Draft: Initial state - repair order created, not yet confirmed
- Confirmed: Repair approved and authorized to begin
- Under Repair: Work in progress in the workshop
- Ready: Repair completed, ready for customer pickup
- Repaired: Final state - repair completed and equipment returned
- Cancelled: Repair order cancelled before completion
Warranty Status Integration
Warranty information displays prominently on repair orders:
- In Warranty: Equipment has active warranty coverage (green badge)
- Warranty Expired: Equipment had warranty that has expired (orange badge)
- No Warranty: Equipment never had warranty coverage (red badge)
Important: This module requires the Equipment Warranty Management (cs_client_equipment_warranty) module to be installed. Warranty status tracking depends on warranty records being configured for equipment.
3. Creating Repair Orders
Creating from Equipment Record
The primary method for creating workshop repair orders is directly from equipment records, ensuring proper equipment linkage and automatic data population.
Process - Creating Workshop Repair Order:
Scenario: Customer brings fire extinguisher to workshop for annual service
- Navigate to Client Equipment → Equipment
- Locate equipment using search (serial number, customer name, or equipment details)
- Open equipment record
- Click Create Workshop Repair button in header
System creates new repair order with automatic population:
- Client Equipment Repair: Linked to selected equipment
- Partner: Equipment owner/customer
- Owner: Equipment owner
- Serial Number: From equipment record
- Model: From equipment record
- Warranty Status: Current warranty state with badge indicator
- Active Warranty: Link to active warranty record if applicable
- Complete additional repair order details
- Save repair order
Repair Order Details
After automatic population, complete remaining repair order information:
- Product to Repair: Select product template if applicable for invoicing
- Location: Workshop location (warehouse)
- Invoice Method: Before/After/No invoice depending on business process
- Operations: Add labor operations (service tasks)
- Parts: Add parts to be installed or replaced
- Notes: Document issue description, requested work, or special instructions
Equipment Tab Information
The Equipment tab on repair orders displays complete equipment context:
- Owner/customer details
- Equipment serial number
- Equipment model
- Direct link to equipment record for full details
4. Repair Order Workflow
Confirming Repair Order
After creating draft repair order with all details:
Process - Confirming Repair:
Review repair order completeness:
- Operations defined (labor tasks)
- Parts added if needed
- Customer information verified
- Warranty status noted
- Click Confirm Repair button
- Repair state changes from Draft to Confirmed
- Repair authorized to begin work
- Parts can be reserved from inventory if configured
Starting Workshop Work
When technician begins work on confirmed repair:
Process - Starting Repair Work:
- Open confirmed repair order
- Click Start Repair button
- State changes to Under Repair
- Indicates work is actively in progress
- Technicians can now record timesheet entries for labor
Recording Operations and Parts
As work progresses, document operations performed and parts used:
Operations Tab:
- Add labor operations (e.g., "Diagnostic Test", "Replace Safety Valve")
- Specify duration for each operation
- Set unit price for labor billing
- Operations feed into invoicing if configured
Parts Tab:
- Add parts/products used in repair
- Specify quantities consumed
- System tracks inventory consumption
- Parts appear on invoice if configured
Completing Repair
Process - Marking Repair Complete:
- Verify all work completed
- Ensure all operations and parts recorded
- Add any final notes or observations
- Click Repair Ready button
- State changes to Ready
- Indicates equipment ready for customer pickup/return
- Generate invoice if configured
- Notify customer of completion
- When customer collects equipment, click End Repair
- State changes to Repaired (final state)
- Repair order complete
Cancelling Repair Orders
If repair cannot be completed or customer cancels:
- Open repair order in any state (Draft, Confirmed, Under Repair)
- Click Cancel Repair button
- State changes to Cancelled
- Repair order preserved for historical record
- Can document cancellation reason in notes
5. Warranty Status Tracking
Warranty Visibility on Repair Orders
Warranty information displays prominently to help determine coverage and billing decisions:
Warranty Status Display:
Warranty Status Badge: Color-coded indicator showing current warranty state
- Green: In Warranty
- Orange: Warranty Expired
- Red: No Warranty
- Active Warranty Field: Direct link to active warranty record
- Equipment Tab: Complete equipment details including warranty information
Using Warranty Information
Warranty status informs repair processing decisions:
Warranty-Covered Repair Process:
Scenario: Equipment under warranty requires repair
- Create repair order from equipment record
- Review warranty status badge: "In Warranty" (green)
Click Active Warranty link to view warranty details:
- Warranty configuration (coverage type)
- Start and end dates
- Sales order reference
- Determine if issue is covered under warranty terms
If covered:
- Set invoice method to "No invoice" or coordinate with warranty provider
- Document warranty coverage in repair notes
- Reference warranty number on repair order
- Process repair using standard workflow
- Maintain documentation for warranty claim if needed
Expired or No Warranty
When equipment lacks warranty coverage:
- Warranty status clearly indicates no coverage
- Standard repair pricing applies
- Configure invoice method appropriately
- Opportunity to offer warranty extension or new warranty
6. Timesheet Integration
Recording Labor Hours
The module integrates with Odoo's timesheet functionality to track labor hours spent on repairs:
Process - Recording Timesheet Entries:
- Open repair order in Under Repair state
- Navigate to Timesheet tab
- Click Add a line to create timesheet entry
Complete timesheet fields:
- Date: When work was performed
- Employee: Technician who performed work
- Description: Work performed (auto-populated with repair reference)
- Hours: Time spent on repair
- Save timesheet entry
- Entry links automatically to repair order
- Hours tracked for labor cost analysis
Timesheet Benefits
Timesheet integration provides multiple business benefits:
- Labor Cost Tracking: Understand actual time invested in repairs
- Employee Productivity: Analyze technician efficiency and workload
- Job Costing: Compare actual labor hours to estimated operations
- Billing Accuracy: Support time-based billing with documented hours
- Warranty Claims: Provide labor hour documentation for warranty provider claims
Viewing Timesheet History
All timesheet entries for a repair display in the Timesheet tab:
- Chronological list of all labor entries
- Employee names and hours per entry
- Total hours calculation
- Links to full timesheet records for editing if needed
7. Equipment Repair History
Accessing Workshop Repair History
Complete workshop repair history is maintained for each equipment unit:
Viewing Equipment Workshop Repairs:
- Navigate to Client Equipment → Equipment
- Open equipment record
- Click Workshop Repairs smart button (shows count of workshop repairs)
- View list of all workshop repair orders for this equipment
List displays:
- Repair order reference
- Creation date
- Current state
- Partner/customer
- Warranty status at time of repair
Repair Order Details from History
Opening historical repair orders from equipment provides complete record:
- Original repair order details and configuration
- Operations performed and parts used
- Timesheet entries showing labor hours
- Warranty status at time of repair
- Notes and documentation
- Invoicing information if applicable
Repair History Analysis
Equipment repair history supports business intelligence:
- Reliability Assessment: Frequent repairs may indicate equipment issues
- Warranty Performance: Track repairs during warranty period
- Customer Service: Reference past repairs when customer inquires
- Cost Analysis: Understand total cost of ownership including repair history
- Replacement Decisions: Determine when repair costs justify replacement
8. Standard Workflows
Workflow 1: Standard Warranty Repair
Scenario: Customer brings equipment to workshop for repair under active warranty
Process:
Customer Intake:
- Customer arrives with fire extinguisher requiring service
- Service advisor obtains equipment serial number
- Searches equipment records to locate unit
Repair Order Creation:
- Opens equipment record
- Clicks Create Workshop Repair
- System populates equipment details automatically
- Warranty Status displays: "In Warranty" (green badge)
- Clicks Active Warranty link to review coverage
- Confirms warranty covers reported issue
Repair Configuration:
- Product to Repair: "Fire Extinguisher - 5kg"
- Invoice Method: "No Invoice" (warranty covered)
- Operations: Add "Annual Service & Recharge"
- Notes: "Customer reports low pressure. Covered under warranty WR00123."
- Saves and confirms repair order
Workshop Execution:
- Technician receives confirmed repair order
- Clicks Start Repair
- Performs service and recharge
- Records timesheet: 1.5 hours
- Parts used: "Safety Valve" added to Parts tab
Completion:
- Technician clicks Repair Ready
- Service advisor contacts customer
- Customer collects equipment
- Clicks End Repair - state changes to Repaired
- Repair history automatically recorded on equipment
- No invoice generated (warranty covered)
Workflow 2: Out-of-Warranty Paid Repair
Scenario: Equipment with expired warranty requires repair, customer will be invoiced
Process:
Intake and Assessment:
- Customer brings equipment with reported issue
- Service advisor creates repair order from equipment
- Warranty Status: "Warranty Expired" (orange badge)
- Advises customer that standard repair charges apply
Quote Generation:
- Operations: "Diagnostic - 1 hour @ $75/hour"
- Operations: "Repair Work - 2 hours @ $75/hour"
- Parts: "Replacement Part X - $120"
- Invoice Method: "Before Repair" (require payment authorization)
- System calculates total: $345 + tax
Customer Authorization:
- Provides quote to customer
- Customer authorizes repair
- Confirms repair order
Repair Execution:
- Technician starts repair
- Performs diagnostic and identifies issue
- Replaces faulty part
- Tests equipment operation
- Records 3 hours on timesheet across diagnostic and repair
Invoicing and Completion:
- Marks repair as Ready
- Generates invoice based on operations and parts
- Customer pays invoice
- Collects equipment
- Ends repair order
- Complete repair history maintained
Workflow 3: Diagnostic with Cancellation
Scenario: Equipment brought in for diagnosis, customer declines repair after assessment
Process:
Initial Diagnostic Order:
- Customer requests diagnostic assessment
- Creates repair order from equipment
- Operations: "Diagnostic Assessment - 1 hour @ $75"
- Invoice Method: "Before Repair" (diagnostic fee)
- Confirms repair order
Diagnostic Execution:
- Technician starts repair
- Performs diagnostic testing
- Identifies issue: "Main circuit board failed, replacement cost $850"
- Records 1 hour timesheet
- Documents findings in notes
Customer Communication:
- Service advisor contacts customer with findings
- Provides repair quote: $850 parts + $150 labor = $1,000
- Customer declines: repair cost exceeds equipment value
Order Cancellation:
- Clicks Cancel Repair
- Notes: "Customer declined repair. Diagnostic fee paid. Equipment returned unrepaired."
- Generates invoice for diagnostic fee only
- Customer pays diagnostic invoice and collects equipment
Documentation:
- Cancelled repair order remains in history
- Diagnostic findings documented for future reference
- Equipment record shows attempted repair with outcome
9. Troubleshooting
Issue: Warranty Status Not Displaying
Symptom: Warranty Status field is empty or shows "No Warranty" when warranty should be active.
Cause: Equipment may not have warranty record or warranty module not installed.
Resolution:
- Verify Equipment Warranty Management module is installed
- Open equipment record
- Check if Warranty Status field shows warranty state
If no warranty record exists:
- Navigate to equipment's Warranties smart button
- Create warranty record if equipment should have coverage
- Ensure warranty dates are current
- Refresh repair order - warranty status should update
Issue: Equipment Details Not Auto-Populating
Symptom: Serial number, model, or owner fields are empty on new repair order.
Cause: Repair order not created through equipment record or equipment fields incomplete.
Resolution:
- Always create repair orders using "Create Workshop Repair" button on equipment
If created manually:
- Select equipment in Client Equipment Repair field
- System should populate details automatically
- If not, manually enter serial number, model, and owner
Verify equipment record has complete information:
- Serial number populated
- Model field completed
- Client/owner specified
Issue: Cannot Record Timesheet Entries
Symptom: Timesheet tab exists but cannot add entries or entries don't save.
Cause: User lacks timesheet permissions or hr_timesheet module not installed.
Resolution:
- Verify hr_timesheet module is installed (required dependency)
Check user permissions:
- User must have timesheet creation permissions
- Contact administrator to grant timesheet access
- Verify employee record exists for user
- Ensure repair order is in confirmed or active state
Issue: Repair History Not Showing on Equipment
Symptom: Workshop Repairs smart button shows count but clicking opens empty list.
Cause: Repairs may exist but not properly linked to equipment.
Resolution:
- Navigate to Repair → Repair Orders (main repair order menu)
- Search for repairs for this customer
- Open repair orders to verify equipment linkage
If Client Equipment Repair field is empty:
- Edit repair order
- Select correct equipment
- Save - repair should now appear in equipment history
Issue: Cannot Start Repair
Symptom: Start Repair button doesn't work or is not visible.
Cause: Repair order not in correct state or workflow permissions.
Resolution:
- Verify repair order is in Confirmed state
- Cannot start repair from Draft state - must confirm first
- Check user has repair order management permissions
- If repair is already Under Repair, button will not appear (already started)
Issue: Parts Not Deducting from Inventory
Symptom: Added parts to repair but inventory not updating.
Cause: Repair module inventory configuration or parts not consumed.
Resolution:
- Parts consume from inventory when repair is completed, not when added
- Verify repair workflow has reached appropriate state
- Check parts have inventory location specified
- Verify product is set as stockable product
- Check repair order picking/delivery operations if configured
- This is standard Odoo repair behavior - consult Odoo repair documentation for inventory integration
Issue: Cannot Find Equipment in Repair Menu
Symptom: Looking for equipment list under Repair menu but not finding it.
Cause: Equipment accessed through Client Equipment menu, not Repair menu.
Resolution:
- Equipment records are in Client Equipment → Equipment
- Repair orders are in Repair → Repair Orders
- Link between them is through Client Equipment Repair field on repair orders
- Access equipment first, then create repairs from equipment
- There is also a Client Equipment link in Repair menu for quick access
Issue: Warranty Badge Showing Wrong Color
Symptom: Warranty badge color doesn't match actual warranty status.
Cause: Warranty status may have changed after repair order created.
Resolution:
- Warranty status captured at repair order creation
- If warranty status changed after creation, refresh repair order:
- Open equipment record and verify current warranty status
- Return to repair order and refresh
- Badge should update to reflect current status
- If not updating, warranty status is historical snapshot from creation time
© 2018 Cyder Solutions. All rights reserved. | www.cyder.com.au